Wednesday, July 20, 2011
Installing Webmin on CentOS 5.5
Step 1: Get the RPM, run this command
wget http://prdownloads.sourceforge.net/webadmin/webmin-1.520-1.noarch.rpm
Step 2: Install the RPM, run this command
rpm -U webmin-1.520-1.noarch.rpm
Step 3: Open the firewall on port 10000. Run this command
iptables -I INPUT -p tcp --dport 10000 -j ACCEPT
now you can access webmin via http://server:10000 using your shell credentials.
Enjoy!
Saturday, February 26, 2011
How to Enable Telnet in your Windows 7 Operating System
Ok, been wondrin for a while why the hell telnet is not available in my Windows 7 workstation. I am using telnet a lot so I did some research. Windows 7 disabled the Telnet by default, so basically, the answer is pretty simple.

Win + R and type appwiz.cpl
Turn Windows features on or off
Scroll down and check the Telnet Client box.

Hit OK and you're done. Enjoy!
Thursday, February 24, 2011
Install and configure NTP in Centos 5.5
You can easily install NTP (Network Time Protocol, a means of transmitting time signals over a computer network) using yum command under Redhat or CentOS/Fedora core Linux.
Login to shell:
Done!
Login to shell:
yum install ntp
chkconfig ntpd on
ntpdate pool.ntp.org
/etc/init.d/ntpd start
Done!
Thursday, February 10, 2011
Creating Portable Apps using VMware Thinapp
Okay, been using this for years and just wan't to show how its done.
You could create your personal portable applications or games using vmware thinapp. this is a very useful tool specially if you want a specific apps/games to be plug and play in your usb stick or whatever. here's how to.
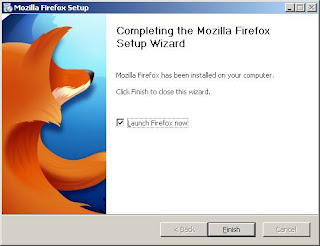
Im going create a portable mozilla firefox.


You could create your personal portable applications or games using vmware thinapp. this is a very useful tool specially if you want a specific apps/games to be plug and play in your usb stick or whatever. here's how to.
Im going create a portable mozilla firefox.
install vmware thinapp.
run the thinapp setup capture

click next

start the precan

install the application and configure it to whatever settings you want


click the postscan and keep on next until the entry points. select only the application you've installed.

keep hitting next until you were asked to build the application.

you're done.
Saturday, February 5, 2011
Configuring the PPTP VPN client under Windows XP
Start > Control Panel > Network Connections
File > New Connection > Next
Connect to the network at my workplace > Next
Select VPN connection > Next
Enter descriptive name for connection > Next

Do not dial the initial connection > Next
Enter hostname or PUBLIC IP address of the PPTP server > Next
now try to connect by entering the Username and Password and click Connect.

verifying, registering.. and done!

How to setup PPTP VPN server using pfSense
Login to your pfSense administration panel and configure the VPN PPTP.
go to VPN > PPTP > Configuration

Tick the radio button "Enable PPTP server"
Enter the Server address (Enter the Public IP address the PPTP server should use on its side for all clients.)
Enter the Remote address range. (eg. 10.22.20.0/28)
Click Save
Add a Firewall Rule.

go to Firewall > Rules
Allow it all or block some ports and protocols. Mine is allow all.
Add Users

go to VPN > PPTP > Users
Enter the Username and Password aswell as the IP. Make sure that its covered under the Remote address range that was setup in your configuration. (eg. 10.22.20.22)
Following this, you should have a working PPTP VPN server working.
Thursday, February 3, 2011
Setting Timeout Options for Remote Desktop Connections
You can set the maximum amount of idle time allowed for remote desktop connections.
To Set Timeout Options for Remote Desktop Connections
To Set Timeout Options for Remote Desktop Connections
- From your computer's Start menu, point to Programs, point to Admin Tools, and then click Terminal Services Configuration.
- In the right pane of the window, click RDP-Tcp.
- Click the Sessions tab.
- Specify the values you want to use.
Linksys PAP2-NA Phone Adapter Configuration Instructions
Connect the Phone Adapter as illustrated:

Enter the Configuration Menu:
Look for IP Address of the phone adapter
Type the IP address onto the address bar of your browser.
Click “Admin Login” as illustrated

System Settings
Click on “System” Tab and enter the information as illustrated. Click “Save Settings” when done.

SIP Settings
Click on “SIP” Tab and enter the information as illustrated. Click “Save Settings” when done.

Configure Line 1 or 2
Click on “Line 1” Tab and enter the information as illustrated. Click “Save Settings” when done.

Default port for SIP is 5060.

Enter the Configuration Menu:
Look for IP Address of the phone adapter
Pick up the phone and type * * * * (star key x 4)
Type 110#
The IP address would be read out
Type the IP address onto the address bar of your browser.
Click “Admin Login” as illustrated

System Settings
Click on “System” Tab and enter the information as illustrated. Click “Save Settings” when done.

SIP Settings
Click on “SIP” Tab and enter the information as illustrated. Click “Save Settings” when done.

Configure Line 1 or 2
Click on “Line 1” Tab and enter the information as illustrated. Click “Save Settings” when done.

Default port for SIP is 5060.
How to install Centos 5.5 on Microsoft Hyper-V
Basically, you will be able to install any linux operating system using hyper-v, but the main problem is there is no network! I tried to google a bit and found a solution. this is via installation of linux intergration services.
Download the file here:
http://www.microsoft.com/downloads/en/details.aspx?displaylang=en&FamilyID=eee39325-898b-4522-9b4c-f4b5b9b64551
Installing Linux Integration Services Version 2.1 on Red Hat Enterprise Linux 5
In Hyper-V Manager, configure LinuxIC v21.ISO (located in the directory where you extracted the downloaded files) as a physical CD/DVD drive on the virtual machine.

As the root user, mount the CD in the virtual machine by issuing the following commands at a shell prompt:
Copy Linux Integration Services to the virtual machine. For example:
As the root user, run the following command to compile and install the synthetic drivers. A reboot is required after installation.

and congrats, you have a Linux OS running in Microsoft Hyper-V.
Download the file here:
http://www.microsoft.com/downloads/en/details.aspx?displaylang=en&FamilyID=eee39325-898b-4522-9b4c-f4b5b9b64551
Installing Linux Integration Services Version 2.1 on Red Hat Enterprise Linux 5
In Hyper-V Manager, configure LinuxIC v21.ISO (located in the directory where you extracted the downloaded files) as a physical CD/DVD drive on the virtual machine.

As the root user, mount the CD in the virtual machine by issuing the following commands at a shell prompt:
mkdir /mnt/cdrom
mount /dev/cdrom /mnt/cdrom
Copy Linux Integration Services to the virtual machine. For example:
mkdir /opt/linux_ic_v21_rtm
cp –R /mnt/cdrom/* /opt/linux_ic_v21_rtm
As the root user, run the following command to compile and install the synthetic drivers. A reboot is required after installation.
cd /opt/linux_ic_v21_rtm/
make
make install
reboot

and congrats, you have a Linux OS running in Microsoft Hyper-V.
Friday, January 28, 2011
Setting up a DHCP server in Windows Server 2003
The DHCP server assigns a client an IP address taken from a predefined scope for a given amount of time. If an IP address is required for longer than the lease has been set for, the client must request an extension before the lease expires. If the client has not requested an extension on the lease time, the IP address will be considered free and can be assigned to another client. If the user wishes to change IP address then they can do so by typing "ipconfig /release", followed by "ipconfig /renew" in the command prompt. This will remove the current IP address and request a new one. Reservations can be defined on the DHCP server to allow certain clients to have their own IP address (this will be discussed a little later on). Addresses can be reserved for a MAC address or a host name so these clients will have a fixed IP address that is configured automatically. Most Internet Service Providers use DHCP to assign new IP addresses to client computers when a customer connects to the internet - this simplifies things at user level.

The above diagram diplays a simple structure consisting of a DHCP server and a number of client computers on a network.
The DHCP Server itself contains an IP Address Database which holds all the IP addresses available for distribution. If the client (a member of the network with a Windows 2000 Professional/XP operating system, for example) has "obtain an IP address automatically" enabled in TCP/IP settings, then it is able to receive an IP address from the DHCP server.
Setting up a DHCP Server
This will serve as a step-by-step guide on how to setup a DHCP server.
Installing the DHCP server is made quite easy in Windows 2003. By using the "Manage your server" wizard, you are able to enter the details you require and have the wizard set the basics for you. Open to "Manage your server" wizard, select the DHCP server option for the list of server roles and press Next.
You will be asked to enter the name and description of your scope.
Scope: A scope is a collection of IP addresses for computers on a subnet that use DHCP.

The next window will ask you to define the range of addresses that the scope will distribute across the network and the subnet mask for the IP address. Enter the appropriate details and click next.

You are shown a window in which you must add any exclusions to the range of IP addresses you specified in the previous window. If for example, the IP address 10.0.0.150 is that of the company router then you won't want the DHCP server to be able to distribute that address as well. In this example I have excluded a range of IP addresses, 10.0.0.100 to 10.0.0.110, and a single address, 10.0.0.150. In this case, eleven IP's will be reserved and not distributed amongst the network clients.

It is now time to set the lease duration for how long a client can use an IP address assigned to it from this scope. It is recommended to add longer leases for a fixed network (in the office for example) and shorter leases for remote connections or laptop computers. In this example I have set a lease duration of twelve hours since the network clients would be a fixed desktop computer in a local office and the usual working time is eight hours.

You are given a choice of whether or not you wish to configure the DHCP options for the scope now or later. If you choose Yes then the upcoming screenshots will be of use to you. Choosing No will allow you to configure these options at a later stage.

The router, or gateway, IP address may be entered in next. The client computers will then know which router to use.

In the following window, the DNS and domain name settings can be entered. The DNS server IP address will be distributed by the DHCP server and given to the client.

If you have WINS setup then here is where to enter the IP Address of the WINS server. You can just input the server name into the appropriate box and press "Resolve" to allow it to find the IP address itself.

The last step is to activate the scope - just press next when you see the window below. The DHCP server will not work unless you do this.

The DHCP server has now been installed with the basic settings in place. The next stage is to configure it to the needs of your network structure.
SOURCE: http://www.windowsnetworking.com
The above diagram diplays a simple structure consisting of a DHCP server and a number of client computers on a network.
The DHCP Server itself contains an IP Address Database which holds all the IP addresses available for distribution. If the client (a member of the network with a Windows 2000 Professional/XP operating system, for example) has "obtain an IP address automatically" enabled in TCP/IP settings, then it is able to receive an IP address from the DHCP server.
Setting up a DHCP Server
This will serve as a step-by-step guide on how to setup a DHCP server.
Installing the DHCP server is made quite easy in Windows 2003. By using the "Manage your server" wizard, you are able to enter the details you require and have the wizard set the basics for you. Open to "Manage your server" wizard, select the DHCP server option for the list of server roles and press Next.
You will be asked to enter the name and description of your scope.
Scope: A scope is a collection of IP addresses for computers on a subnet that use DHCP.
The next window will ask you to define the range of addresses that the scope will distribute across the network and the subnet mask for the IP address. Enter the appropriate details and click next.
You are shown a window in which you must add any exclusions to the range of IP addresses you specified in the previous window. If for example, the IP address 10.0.0.150 is that of the company router then you won't want the DHCP server to be able to distribute that address as well. In this example I have excluded a range of IP addresses, 10.0.0.100 to 10.0.0.110, and a single address, 10.0.0.150. In this case, eleven IP's will be reserved and not distributed amongst the network clients.
It is now time to set the lease duration for how long a client can use an IP address assigned to it from this scope. It is recommended to add longer leases for a fixed network (in the office for example) and shorter leases for remote connections or laptop computers. In this example I have set a lease duration of twelve hours since the network clients would be a fixed desktop computer in a local office and the usual working time is eight hours.
You are given a choice of whether or not you wish to configure the DHCP options for the scope now or later. If you choose Yes then the upcoming screenshots will be of use to you. Choosing No will allow you to configure these options at a later stage.
The router, or gateway, IP address may be entered in next. The client computers will then know which router to use.
In the following window, the DNS and domain name settings can be entered. The DNS server IP address will be distributed by the DHCP server and given to the client.
If you have WINS setup then here is where to enter the IP Address of the WINS server. You can just input the server name into the appropriate box and press "Resolve" to allow it to find the IP address itself.
The last step is to activate the scope - just press next when you see the window below. The DHCP server will not work unless you do this.
The DHCP server has now been installed with the basic settings in place. The next stage is to configure it to the needs of your network structure.
SOURCE: http://www.windowsnetworking.com
Squid Proxy Server Installation Guide on CentOS 5.5

There are two options in Squid:
- Configure Squid Server and set browser(firefox,internet explorer,chrome) for proxy.Disadvantage of this method is user can change the setting and he comes to know that porxy is intalled in network.
- Transparent Squid: Benefit of setting transparent proxy is you do not have to setup up individual browsers to work with proxies.
Disable iptables and selinux
system-config-selinux
system-config-firewall
yum install squid
vi /etc/squid/squid.conf
make the follow changes in file (you may need to search for these lines and uncomment it ) (change the network which suits your environment)
acl our_networks src 192.168.1.0/24 192.168.2.0/24
http_access allow our_networks
Start the squid server
chkconfig squid on
/etc/init.d/squid start
To verify Squid service is running and port 3128 on which squid by default runs use:
netstat -tulpn | grep 3128
Client configuration:
Open a web browser > Tools > Internet option > Network settings > and setup Squid server IP address and port # 3128.
For Mozilla Firefox
goto Edit-->Prefernces-->Advanced-->Network-->Setting--> and setup Squid server IP address and port # 3128
Transparent Squid:
vi /etc/squid/squid.confModify or add following squid directives:
httpd_accel_host virtual
httpd_accel_port 80
httpd_accel_with_proxy on
httpd_accel_uses_host_header on
acl lan src 192.168.1.1 192.168.2.0/24
http_access allow localhost
http_access allow lan
Restart the squid
/etc/init.d/squid restart
chkconfig squid on
Now we will add the iptables rules to redirect port 80 http request to port 3128
For that keep in mind that we need following setup
Eth0: IP:192.168.1.1
iii) Eth1: IP: 192.168.2.1 (192.168.2.0/24 network
add following rules to forward all http requests (coming to port 80) to the Squid server port 3128 :
iptables -t nat -A PREROUTING -i eth1 -p tcp --dport 80 -j DNAT --to 192.168.1.1:3128
iptables -t nat -A PREROUTING -i eth0 -p tcp --dport 80 -j REDIRECT --to-port 3128
Saturday, January 22, 2011
Proxy Settings via GPO using Windows Server 2008
If you want all of your users to be automatically configured, you would then create a Group Policy Object (GPO) and link it to the domain object using GPMC.
Location:
User Configuration > Policies > Windows Settings > Internet Explorer Maintenance > Connection > Proxy Settings

Location:
User Configuration > Policies > Windows Settings > Internet Explorer Maintenance > Connection > Proxy Settings

Friday, January 21, 2011
Netvanta 3448 Router Configuration
GETTING STARTED
Two configuration methods are available for your NetVanta router:
The GUI lets you configure the main unit settings and provides online guidance and explanations for each setting. However, using the AOS CLI may be necessary for more advanced configurations.
ACCESS THE GUI
You may access the web-based GUI from any web browser on your network by following these steps:
Access the AOS CLI via the CONSOLE port or a Telnet session. To establish a connection to the NetVanta router CONSOLE port, you need the following items:
CONFIGURE THE UNIT’S IP ADDRESS
The following steps create an IP address and subnet mask for ETH 0/1. If you are not sure what IP address to assign, please contact your network administrator.
The following steps create a password of adtran for Telnet access. By default, Telnet access is enabled with a password of password.
CONFIGURE YOUR APPLICATION
More detailed documentation for configuring your ADTRAN unit is provided on the ADTRAN OS System Documentation CD included in your shipment. For more detail on hardware setup, refer to the appropriate NIM Quick Start Guides and the Hardware Installation Guide. For more detail on configuring your system, refer to the ADTRAN Operating System (AOS) Command Reference Guide, configuration guides, and technical support notes.
Source: ADTRAN QUICK START GUIDE
Two configuration methods are available for your NetVanta router:
- Web-based GUI
- AOS Command Line Interface (CLI)
The GUI lets you configure the main unit settings and provides online guidance and explanations for each setting. However, using the AOS CLI may be necessary for more advanced configurations.
ACCESS THE GUI
You may access the web-based GUI from any web browser on your network by following these steps:
- Connect the router to your PC using the ETH 0/1 port on the back of the unit.
- Set your PC to a fixed IP address of 10.10.10.2. If you cannot change the PC’s IP address, you will need to change the unit’s IP address using the CLI. (Refer to the next two sections for instructions.)
- Enter the unit’s IP address in your browser address line. The default IP address is 10.10.10.1.
- You will then be prompted for the username and password (the default settings are admin and password).
- The initial GUI screen appears.
Access the AOS CLI via the CONSOLE port or a Telnet session. To establish a connection to the NetVanta router CONSOLE port, you need the following items:
- VT100 terminal or PC (with VT100 terminal emulation software)
- Straight-through serial cable with a DB-9 (male) connector on one end and the appropriate interface for your terminal or PC communication port on the other end
- Connect the DB-9 (male) connector of your serial cable to the CONSOLE port on the rear panel of the unit.
- Connect the other end of the serial cable to the terminal or PC.
- Provide power to the unit as appropriate. See the NetVanta 3000 Series Hardware Installation Guide (provided on the ADTRAN OS System Documentation CD) for more details.
- Once the unit is powered up, open a VT100 terminal session using the following settings: 9600 baud, 8 data bits, no parity bits, and 1 stop bit. Press <Enter> to activate the
AOS CLI. - Enter enable at the > prompt.
- Enter the enable password when prompted. The default password is password.
The configuration parameters used in the examples outlined in this document are for instructional purposes only. Please replace all underlined entries (example) with your specific parameters to configure your application.
CONFIGURE THE UNIT’S IP ADDRESS
The following steps create an IP address and subnet mask for ETH 0/1. If you are not sure what IP address to assign, please contact your network administrator.
- At the # prompt, enter config terminal.
- At the (config)# prompt, enter interface eth 0/1 to access the configuration parameters for the Ethernet port located on the rear of the unit.
- Enter ip address 10.26.12.12 255.255.255.0 to assign an IP address to the Ethernet port using a 24-bit subnet mask.
- Enter ip route 0.0.0.0 0.0.0.0 192.22.72.2 to add a default route to the route table. If necessary, contact your network administrator to obtain the IP address (and subnet mask) for your particular configuration.
- Enter no shutdown to activate the interface to pass data.
- Enter exit to exit the Ethernet interface commands and return to the Global Configuration mode.
Depending on your configuration, you may need to set a default gateway as well using the (config)#ip default gateway command. If IP routing is enabled on the unit, do NOT set a default gateway.ENABLE TELNET ACCESS
The following steps create a password of adtran for Telnet access. By default, Telnet access is enabled with a password of password.
- Verify that the prompt of your unit displays (config)#.
- Enter line telnet 0 4 to change the configuration parameters for the Telnet sessions.
- Enter login to initiate Telnet access.
- Enter password adtran to change the login password for the Telnet sessions.
- Enter exit to return to the Global Configuration mode.
- Verify that the prompt of your unit displays (config)#.
- Enter do write memory to save the current configuration.
CONFIGURE YOUR APPLICATION
More detailed documentation for configuring your ADTRAN unit is provided on the ADTRAN OS System Documentation CD included in your shipment. For more detail on hardware setup, refer to the appropriate NIM Quick Start Guides and the Hardware Installation Guide. For more detail on configuring your system, refer to the ADTRAN Operating System (AOS) Command Reference Guide, configuration guides, and technical support notes.
Important: For additional details on product features, specifications, installation, and safety, refer to the appropriate Hardware Installation Guide on the ADTRAN OS System Documentation CD shipped with the base unit and available online at www.adtran.com.
Source: ADTRAN QUICK START GUIDE
Thursday, January 20, 2011
How to Optimize Windows 7 Desktop
SOURCE: akeness.blogspot.com
Getting the best out of your System!
Here's my personal tips and tweaks to get the best performance of your Windows 7 desktop.
1) Editing the performance options
- Right Click on My Computer then choose Properties.
- Click on Advanced system settings.
- In the Advanced tab under Performance, Click on Settings and choose the "Adjust for best performance".
- Click Apply and hit OK.
2) Tweaking the boot configuration and the system services and startup via msconfig
- Open the RUN command, and type in msconfig
- Click on the Boot tab, edit the Timeout seconds to 3 and click on Advanced options.
- Put the max processor available in the Number of processors options and alot full memory in the Maximum memory option and hit OK.
- Click on the Services tab and check the Hide all Microsoft services.
- You can uncheck everything or just choose the application services you need and click on Apply.
- Click on the Startup tab and click on Disable all. Click on Apply and hit OK.
- Reboot!
After reboot, You will notice that your system is a lot faster than it was before or even small difference but result is actually different. :)
How to create Linux guest operating system on Hyper-V
I tried to install and create Linux box in our Hyper-V servers and I failed. Common issues is the Network Adapter cannot be installed, therefore there will be no eth0 or whatsoever. Doing some research, You just need Linux integrated services for Hyper-V. This is set of drivers that enable synthetic device support in supported Linux virtual machines under Hyper-V. So here it is:
Linux Integration Services for Hyper-V
Download and just follow the documentation Inside.
Linux Integration Services for Hyper-V
Download and just follow the documentation Inside.
Forgotten root Password - Fedora / CentOS
SOURCE: akeness.blogspot.com
You can log in using single-user mode and create a new root password.
To enter single-user mode, reboot your computer. If you use the default boot loader, GRUB, you can enter single user mode by performing the following:
1. At the boot loader menu, use the arrow keys to highlight the installation you want to edit and type [A] to enter into append mode.
2. You are presented with a prompt that looks similar to the following:
3. Press the Spacebar once to add a blank space, then add the word single to tell GRUB to boot into single-user Linux mode. The result should look like the following:
4. Press [Enter] and GRUB will boot single-user Linux mode. After it finishes loading, you will be presented with a shell prompt similar to the following:
5. You can now change the root password by typing
Here is my step by step screenshot resetting my own root password.
step 1
step 2
step 3
step 4
step 5
step 6
Enjoy!
You can log in using single-user mode and create a new root password.
To enter single-user mode, reboot your computer. If you use the default boot loader, GRUB, you can enter single user mode by performing the following:
1. At the boot loader menu, use the arrow keys to highlight the installation you want to edit and type [A] to enter into append mode.
2. You are presented with a prompt that looks similar to the following:
grub append> ro root=LABEL=/
3. Press the Spacebar once to add a blank space, then add the word single to tell GRUB to boot into single-user Linux mode. The result should look like the following:
ro root=LABEL=/ single
4. Press [Enter] and GRUB will boot single-user Linux mode. After it finishes loading, you will be presented with a shell prompt similar to the following:
sh-2.05b#
5. You can now change the root password by typing
passwd root
Here is my step by step screenshot resetting my own root password.
step 1
step 2
step 3
step 4
step 5
step 6
Enjoy!
ZoneMinder 1.24.2 Installation Guide on CentOS 5.5
SOURCE: akeness.blogspot.com
Most of this is taken from the zoneminder wiki, others from various posts on their forums.
---
1) yum update then reboot
2) Setup -> Firewall -> disable Security Level and SELinux
3) Disable the following services and then reboot...
apmd
bluetooth
cups
hidd
ip6tables
iptables
netfs
nfslock
pcscd
portmap
4) Add RPM Forge REPO
rpm -Uhv http://apt.sw.be/redhat/el5/en/i386/rpmforge/RPMS/rpmforge-release-0.3.6-1.el5.rf.i386.rpm
5) Install software needed for ZM Installation:
yum -y install mysql mysql-server mysql-devel php php-gd php-mysql httpd gcc pcre-devel gd mod_ssl glib2-devel gcc-c++ ntp gnutls-devel ImageMagick libjpeg-devel perl-Archive-Tar perl-MIME-Lite perl-MIME-tools perl-Date-Manip perl-LWP-UserAgent-Determined perl-PHP-Serialization perl-Device-SerialPort perl-Archive-Zip perl-Sys-Mmap.i386 perl-Module-Load subversion git screen yasm
6) Confirm installation and then reboot.
7) Install ffmpeg
rpm -Uvh http://apt.sw.be/redhat/el5/en/i386/rpmforge/RPMS/rpmforge-release-0.5.1-1.el5.rf.i386.rpm
yum install ffmpeg ffmpeg-devel
8) Turn on services:
chkconfig httpd on
chkconfig mysqld on
chkconfig ntpd on
ntpdate pool.ntp.org
service httpd start
service mysqld start
service ntpd start
9) Setup your MySQL:
/usr/bin/mysql_secure_installation
10) Download and extract ZM files:
cd /root
wget http://www2.zoneminder.com/downloads/ZoneMinder-1.24.2.tar.gz
wget http://www.zoneminder.com/fileadmin/downloads/cambozola.jar
tar -zxvf ZoneMinder-1.24.2.tar.gz
cd ZoneMinder-1.24.2
11) Install
CXXFLAGS=-D__STDC_CONSTANT_MACROS ./configure --with-webdir=/var/www/html/zm --with-cgidir=/var/www/cgi-bin --with-webuser=apache --with-webgroup=apache ZM_DB_HOST=localhost ZM_DB_NAME=zm ZM_DB_USER=zmuser ZM_DB_PASS=yourpassword
make
make install
12) MySQL Preparation:
mysql -u root -p
create database zm;
grant all on zm.* to zmuser@localhost identified by 'yourpassword';
flush privileges;
exit
13) Import the Database:
cd /root/ZoneMinder-1.24.2
mysql -u root -p zm < db/zm_create.sql
14) Finale
cp scripts/zm /etc/init.d/
chmod +x /etc/init.d/zm
chkconfig zm on
cd ..
cp cambozola.jar /var/www/html/zm/
chown apache:apache /var/www/html/zm/cambozola.jar
service zm start
--
and you're done! kindly check the wiki / documentation for option properties. adding cams, adjusting this and such..
Rearm Windows from Evaluation Period
SOURCE: akeness.blogspot.com
If your 30 days trial is about to expire, I found a good way to rearm it. I have learned this quirk and I just wanted to share. Here's how to do that:
1) Run your CMD as Administrator.
2) Type slmgr.vbs –rearm
3) Restart your system and smile. :P
If the above command didn't work, specially if you're using Windows 7, Server 2008, Vista, try:
slmgr.vbs /rearm
Have Fun! :)
Dynamic Versus Static IP Addresses
SOURCE: akeness.blogspot.com
Here we describe dynamic and static IP addresses, and discuss the advantages and disadvantages associated with each type.
A.1 Dynamic IP (DHCP) Address
Each time a DHCP client boots, it sends out a DHCP discover message. All DHCP servers answer (in practice only one is set to do this at Fermilab; in the future possibly a second will be added for redundancy) with an offer message that includes an address which is available to the client.
The client machine typically repeats the discover message several times to make sure it hears from all the servers, then eventually chooses the "best" server, where what is "best" is up to the client. It may mean that the addresses the DHCP server has available offer the longest lease time. Or the client might prefer a server that provides WINS servers over one that doesn't (the WINS servers keep track of all the clients' and servers' latest dynamic IP addresses).
The currently active DHCP server is configured by hand to handle and reserve IP addresses and the IP configuration information that goes with them. Addresses are made available in an order that permits a client to have the best chance of getting back the same address it was using most recently. To this end, the DHCP server offers its least recently used address to a new client.
Once the client chooses a DHCP server, it "officially" requests the IP address and configuration information. In addition to this, it receives a lease time for the address. This lease time is not absolute. As long as it is running, the client machine requests renewal of the lease. This is invisible to the user, although there is a mechanism for the user to release the address early ( ipconfig/release from the command prompt).
Client machines in the NT domain typically access multiple file servers, print servers, and so on. The clients as well as the servers may change their IP addresses. Via the WINS servers, this is transparent to the user.
Advantages
1. All the IP configuration information gets automatically configured for your client machine by the DHCP server.
2. If you move your client machine to a different subnet, the client will send out its discover message at boot time and work as usual. However, when you first boot up there you will not be able to get back the IP address you had at your previous location regardless of how little time has passed.
Disadvantage
Your machine name does not change when you get a new IP address. The DNS (Domain Name System) name is associated with your IP address and therefore does change. This only presents a problem if other clients try to access your machine by its DNS name. One example is ftp . If a Windows machine is set up as an ftp server, then its ftp server name (which uses the DNS name) changes every time the IP address does. If you need to use your Windows machine as an ftp server (or as a Web server), request a static IP address rather than a dynamic one.
A.2 Static IP Address
Advantages
1. The two names (Windows name and DNS name) are the same as each other, and neither ever changes. Other clients may therefore reliably access your machine by its DNS name (e.g., using ftp ).
2. With a static address your machine is more easily accessible by non-Windows internet services. This is not a significant advantage as people seldom telnet to their Windows PC.
Disadvantages
1. You can't move your machine to a different subnet and expect it to work. You need to reconfigure it.
2. If machines come and go, or are up only some of the time, static assignments are less resource-efficient (where the resource in question is the IP address itself).
Subscribe to:
Posts (Atom)